
Something we see often during home inspections are missing GFCI’s (Ground Fault Circuit Interrupters). GFCI’s improve the safety of your electrical system and of your home in general. Missing GFCI’s would be marked as a deficiency if they are not installed in the required locations. This blog will teach you how to install GFCI’s to replace an existing, non-GFCI, outlet.
What is a GFCI and Why is it Needed?
 GFCI’s are designed to help prevent people from getting electrocuted. They do this by ‘measuring’ the amount of current leaving and coming back to the outlet from the load (hair tool, kitchen appliance, etc.). If it detects a difference, it will automatically shut off power to that outlet. GFCI’s are especially important around wet areas such as kitchens and bathrooms.
Materials Needed to Install GFCI’s
These are the things that you will need to install your new GFCI outlet:
- Philips head screwdriver
- Flathead screwdriver
- New GFCI receptacle (with included hardware)
- New wall plate (may or may not come with the receptacle)
- Electrical tester (optional)
How to Install a GFCI
This is a fairly easy process that shouldn’t take more than 15 minutes. However, if you are not comfortable or familiar with basic electrical work, we recommend consulting a licensed electrician.
1) Turn off the power to the outlet.
As with any electrical work, you always want to work with the power off. Go to your breaker box and find the correct breaker to turn off the power to the room you are working in. (You can use an electrical tester if you want to test the outlet before beginning to ensure that it has no power.)

2) Remove the wall plate.
After ensuring that the power is off, start by taking off the wall plate. Using a flathead screwdriver, loosen the screws on the plate and remove it.

3) Remove the old receptacle
Using a Philips head screwdriver, unscrew the receptacle and loosen the screws attached to the wires. Remove the wires after loosening the screws they are attached to.

4) Attach GFCI outlet to wires
*NOTE- You will see a “Load” and “Line” side on the back of the GFCI outlet. “Line” will be connected to the power supply. “Load” would be connected to the downstream receptacle if the GFCI is protecting other receptacles downstream.
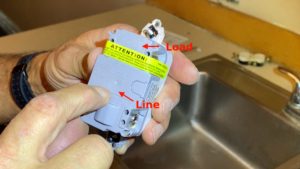
For this step, you will be attaching the wires to the corresponding screws on your new GFCI receptacle. It is important that the wires are in the right place. These wires need to be on the side that says “Line”.
The black (hot) wire will be attached to the gold screw, the white (neutral) wire will be connected to the silver screw, and the green or bare copper (ground) wire will be attached to the single green screw located at the bottom of the receptacle.
When attaching the wires, you want the loops going in the direction that you tighten the screw (clockwise).
Once the wires are on the correct screws, tighten the screws with your Phillips head. The screws should be tight but you don’t want to overtighten them because it could crack the receptacle.
(If this GFCI were to protect the next receptacle in line, then you would hook the wires going to that receptacle on the “Load” side.)
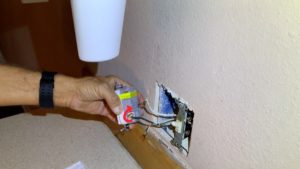
5) Secure the receptacle in the box.
Once the wires are properly attached, push the receptacle back into the box so you can screw it into place. You will likely have to adjust the wires to get the outlet completely into the box.
Screw the receptacle into the box using a Philips head screwdriver. There should be two screws for this, one at the top and one at the bottom.

6) Place the new wall plate over the receptacle.
With your flathead screwdriver, screw the wall plate into place.
7) Turn the power back on.
Go back to your breaker box and turn the power back on.
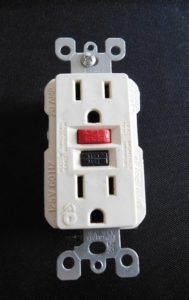
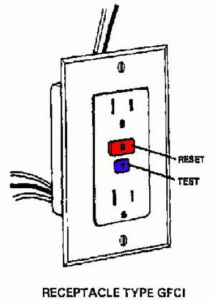
8) Test the GFCI receptacle.
Push the test button on the receptacle and ensure that it trips.
Reset the receptacle by pressing the reset button.
Using these steps, you now know how to install GFCI’s. It is easy, relatively inexpensive, and greatly improves the safety of your home. So if you don’t have them in your home, I strongly encourage you to get them installed.
© 2022 Mike Morgan
This article was written by Mike Morgan, the owner of Morgan Inspection Services. Morgan Inspection Services has been providing home, septic and well inspection services throughout the central Texas area since 2002. He can be reached at 325-998-4663 or at mike@morganinspectionservices.com. No article, or portion thereof, may be reproduced or copied without prior written consent of Mike Morgan.